Search This Blog

Tuesday, October 13, 2015

Adding 2 numbers using Java

Let us have fun to add two numbers in variety of ways :

public class FunWithAdd {
   private int num1;
   private int num2;
  public FunWithAdd(int num1, int num2){
       this.num1=num1;
       this.num2=num2;
   }
   public int getNum1(){
       return num1;
   }
    public int getNum2(){
       return num2;
   }
    public void setNum1(int num1){
        this.num1=num1;
    }
    public void setNum2(int num2){
        this.num2=num2;
    }
   int sum(){
       return num1+num2;
   }
   int sum(int n1, int n2){
       return n1+n2;
   }
   int sumWithItr (int n1, int n2){
      int s=n1;
     
      for(int i=1;i<=n2;i++){
          s++;
      }
      return s;
   }
   int sumRecursive(int n1, int n2){
        if (n2 ==0){
            return n1;
        }
        return sumRecursive(++n1,--n2);
      }
   }

Create a class to test variety of sum methods.

public class Add2Nums {
    public static void main(String[] args) {
        /* Summing Locals */
        int num1=25;
        int num2=12;
        System.out.println("sum : "+(num1+num2));
        /* Sum using Object of FunWithAdd*/
        FunWithAdd numsObject= new FunWithAdd(30,60);
        System.out.println("Adding the numbers in Object : "+numsObject.sum());
        System.out.println("Adding the numbers in Object by sending data from outside :"+numsObject.sum(19,20));
        numsObject.setNum1(7);
        numsObject.setNum2(9);
        System.out.println("sum using sumWithItr method : "  +numsObject.sumWithItr(numsObject.getNum1(),numsObject.getNum2()));
         numsObject.setNum1(43);
        numsObject.setNum2(2);
        System.out.println("sum using sumRecursive: "+numsObject.sumRecursive(numsObject.getNum1(),numsObject.getNum2()));
    }
}

Output :
sum : 37
Adding the numbers in Object : 90
Adding the numbers in Object by sending data from outside :39
sum using sumWithItr method : 16
sum using sumRecursive: 45

Change the values and have fun… :)
©Nancy : created at 2:07 am IST

Java EE 6 Collocated Model

EJB 3.1 provides subset of EJB. This subset is known as EJBLite. EJBLite is available as a part of Java EE6 Web Container. You can create local EJBs with and without interface view. 


EJB 3.1 The benefit is when Web component and EJB component need to access the object for business processing, no marshaling is required. If an EJB makes changes in the object state , web component can view the changes. 

The local EJBs can be packaged in a WAR file. This is called as Collocated model of Java EE 6.

Sunday, June 21, 2015

Interesting Facts about JAVA - 2

Did you know ? (These were later removed from java)
1. All exceptions were unchecked
2. unprotect keyword could be used to avoid signaling asynchronous exceptions

Friday, June 19, 2015

Interesting facts about JAVA - 1

Did you know that the first name given to Java was OAK. And it is NOT an acronym. The name OAK was inspired by the  Oak tree that was seen from the office window.

Sunday, April 26, 2015

First Spring Application from scratch

Step – 0

Download and Install java 7 from http://www.oracle.com/technetwork/java/javase/downloads/jdk7-downloads-1880260.html . Accept License Agreement. Install from zip file.

Step – 1


Step – 2


To install eclipse, unzip eclipse-jee-luna-SR2-win32-x86_64.zip in d:\eclipse.


Step – 3
To start eclipse double click eclipse.exe
Step – 4


Download spring-framework-4.1.6RELEASE-dist.zip file. Unzip this file in d:\spring folder.

Step – 5

Download Apache Commons Logging commons-logging-1.2-bin.zip. Unzip commons-logging-1.2-bin.zip to d:\ commons-logging-1.2 folder.

Step – 6

Download Apache Tomcat Web Application Server from http://tomcat.apache.org/download-70.cgi .
You will get apache-tomcat-7.0.61-windows-x64.zip file. Unzip apache-tomcat-7.0.61-windows-x64.zip to d:\ apache-tomcat-7.0.61.

Step – 7

Start eclipse by double clicking eclipse.exe. You can give a new name for the workspace you want to use for your Spring applications.


Step – 8

Create a new Java project in eclipse Luna IDE.


Select web Dynamic project.


Click Next and give the project name as MyFirstSpringWebApp.


Click next and next. At this point select Generate web.xml deployment descriptor.


And click Finish.

Step – 8 

Prepare your project to be spring web application. You need to add spring libraries to your web project.

Select lib folder in WEB-INF folder in webContent in your Web Application project.


Open d:\spring ( this is the folder where you have unzipped spring jars). Go to the lib folder, you will see all the jars. Select all the jars and copy (ctrl+A and CTRL+C), and then go to eclipse project and paste all these jars in lib folder.


It will look like this.

You need to add Common logging lib too. To do this go to D:\commons-logging-1.2 and copy commons-logging-1.2.jar. and paste this jar to WEB-INF\lib  in your project.

Step – 9 You need to add Application Server to your application. In eclipse IDE, select window ->showview ->others. SelectServer-> servers.


In eclipse IDE you will see server window with the following message…


Click on this link to add Server. Select Apache Tomcat 7.


Click on Add link. Give the path where you have unzipped the Tomcat Apapche 7 server.


Click Finish.

Step – 10

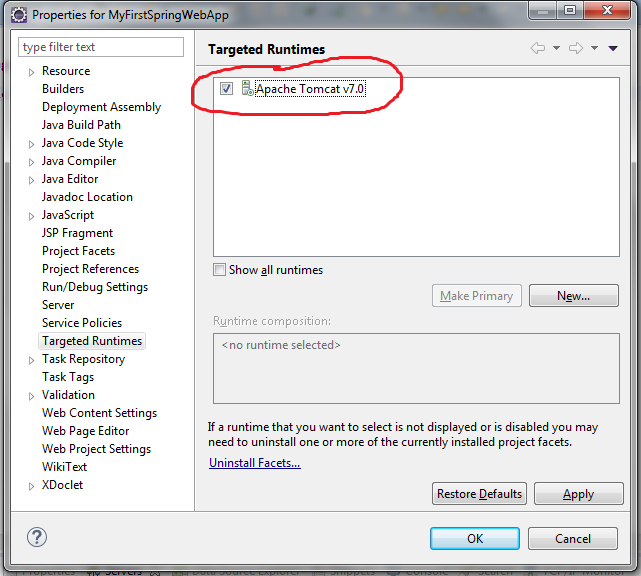
Right click your project and select properties. Select Target Runtime as Apache Tomcat 7.


Step - 11

Create Controller class. Right click your Spring project and select new -> class


Create a class MySpringTestController in package com.nancy.testspringapp.


Click Finish.

Add the following code to the class

package com.nancy.testspringapp;

import javax.servlet.http.HttpServletRequest;
import javax.servlet.http.HttpServletResponse;
import org.springframework.web.servlet.ModelAndView;
import org.springframework.web.servlet.mvc.AbstractController;

public class MySpringTestController extends AbstractController {
      
       @Override
       protected ModelAndView handleRequestInternal(HttpServletRequest request,
              HttpServletResponse response) throws Exception {

              ModelAndView modelandview = new ModelAndView("MyGreetingsPage");
              modelandview.addObject("mygreetingMessage", "hello Welcome to Spring Learning !!!");

              return modelandview;
       }
}


Step – 12 

Add a new jsp page and name it MyGreetingsPage.jsp in WEB-INF and add the following code.

<%@ page language="java" contentType="text/html; charset=ISO-8859-1"
    pageEncoding="ISO-8859-1"%>
<!DOCTYPE html PUBLIC "-//W3C//DTD HTML 4.01 Transitional//EN" "http://www.w3.org/TR/html4/loose.dtd">
<html>
<head>
<meta http-equiv="Content-Type" content="text/html; charset=ISO-8859-1">
<title>Insert title here</title>
</head>
<body>
<h1>My First Spring Web App</h1>
<h2> ${mygreetingMessage }</h2>
</body>
</html>

Step – 13

 Configure web.xml file.

<?xml version="1.0" encoding="UTF-8"?>
<web-app xmlns:xsi="http://www.w3.org/2001/XMLSchema-instance" xmlns="http://java.sun.com/xml/ns/javaee" xsi:schemaLocation="http://java.sun.com/xml/ns/javaee http://java.sun.com/xml/ns/javaee/web-app_3_0.xsd" id="WebApp_ID" version="3.0">
  <display-name>MyFirstSpringWebApp</display-name>
  <servlet>
  <servlet-name>spring-dispatcher</servlet-name>
  <servlet-class>org.springframework.web.servlet.DispatcherServlet</servlet-class>
  </servlet>
  <servlet-mapping>
  <servlet-name>spring-dispatcher</servlet-name>
  <url-pattern>/</url-pattern>
  </servlet-mapping>
</web-app>

Step – 14

 Create spring-dispatcher-servlet.xml file in WEB-INF folder. Add the xml code to the file as:

<beans xmlns="http://www.springframework.org/schema/beans"
       xmlns:xsi="http://www.w3.org/2001/XMLSchema-instance"
       xsi:schemaLocation="http://www.springframework.org/schema/beans
       http://www.springframework.org/schema/beans/spring-beans-2.5.xsd">
      
       <bean id="MyHandlerMapping"
       class="org.springframework.web.servlet.handler.BeanNameUrlHandlerMapping"/>
      
    <bean name="/greetings.html"
       class="com.nancy.testspringapp.MySpringTestController" />    
      
       <bean id="viewResolver"
       class="org.springframework.web.servlet.view.InternalResourceViewResolver">
        <property name="prefix">
            <value>/WEB-INF/</value>
        </property>
        <property name="suffix">
            <value>.jsp</value>
        </property>
   </bean>
</beans>

You are ready to run your first Spring web application. 

Right click the project and Run As -> Run on Server.


You can run the application in internal or external browser by using the url http://localhost:8088/MyFirstSpringWebApp/greetings.html

Enjoy your first Spring Web Application... :)


Friday, April 24, 2015

Information As A Service - IAAS

Information As A Service enables reuse.  Layers of IAAS :

  • Data Sources
  • Data management, Data processing, Data movement
  • Data virtualization
  • Information services
  • Information access

Thursday, April 23, 2015

Ingestion Latency

Ingestion latency can be – 
  • Batch – Data is ingested at regular intervals
  • Micro Batch – ingests delta of data (since last ingestion)
  • Trickle Feed – Continuously ingests data